Windows had been one of the most vital parts of the house. When the door is closed for safety, you can always open the windows for a breath of fresh air. As well as other items and parts of the house, they can also be decorated and styled according to the preferred theme of one’s home. You can put curtains on them, some other decorations depending on the occasion and you can also hang some small plants and chimes near them so that when the wind blows, you will be able to smell the fragrance of the plant, and hear the relaxing sound of the chimes. Windows can also be identified as single pane, or double pane.
Dual Pane windows are and effective way of conserving energy that’s why many people use them nowadays. Now, what if for instance you have a dual pane window in your home, and suddenly it was broken? How will you repair it?
• Take note of your window’s dimensions
Measure the width, height, and total thickness of your window before you can buy a replacement. Buying the correct size of a window is as important as properly installing it. The easiest way of doing this is to measure the dimensions of the frame and note them down. You will need to give the individual thickness of the glass units in case you want the same spacer.
• Unscrew and remove units properly
Once you had bought the proper replacement for your window, you are now ready for doing the repairs. First, gather all the necessary equipment within your reach. Unscrew and remove the units one-by-one and properly take out the broken windows. If there may be smaller pieces, clean them properly with a vacuum.
• Put on the adhesives
Squeeze and apply some caulk to the frame, where you will be installing the new window. Make sure that you apply the caulk evenly so that there would be no air gaps for you to avoid the entrance of chilly air. Place the new unit gently and make sure that it fits in the frame properly.
• Screw down tightly
Once the new window is placed in properly, screw it down tightly, check the free-drilled holes in the frames. and screw the dual pane window accordingly. After securing the screws, try opening, closing, or locking the unit. If the new windows are working fine then install the new window frame. Place the screws to assure firm grip. In case you find more air gaps, then apply more caulk as well.
Repairing windows is quite easy if you just know the measurements of your window. And what’s important as well is that, you should have the proper materials, and be responsible enough to secure the small parts like the screws, nails, etc. now that you have your new window, you can open it once again for a breath of fresh air, and for a better view of the world around you.
When an electrical cord is broken, don’t just throw it away and buy a new one. For it can mean the difference between saving an electrical device and throwing it away. Splicing the cord back together can only take a few minutes using an electrical tape and wire strippers. Just make sure that the correct wires are spliced together and properly re-insulated with tape to avoid shock hazard. Tying the broken ends with an overhand loop adds strength to the repair and will prevent ends from falling apart. Now, how do we properly repair and electrical cord anyway? How to we save electricity by repairing this? Here are some steps on how to do it.
• Cut away the damaged part
Cut away the damaged part of the cord as close to the broken area as possible, leaving two pieces – one, running to the appliance and the other, terminating with the plug.
• Strip away insulation
Use wire cutters to strip away half an inch of insulation from the two wires on each piece of cord.
• Hold two ends together
Hold the two cut ends together, make a short loop of the pieces, then run the two ends through the loop and pull tight.
• Twist
Twist the wire strands to prevent unraveling.
• Attach the wires
Attach the black wires from both pieces of the electrical cord and twist them together.
• Wrap with Tape
Wrap electrician’s tape around the black wires.
• Strengthen the ends
Strengthen the two ends of repaired cord as much as possible and wrap with an amount of electrician’s tape at least equal to the thickness of insulation that was pulled off with the wire cutters.
Once the cord is repaired, it should be almost as strong as it was when you had just bought it. But just a simple warning to all, you must unplug the electrical cord before making any repairs. And also, knotting the two ends of the electrical cord before splicing and wrapping with electrician’s tape will prevent the two spliced ends from falling apart, which could create an electrical hazard.
Many of us thought that a broken electrical cord won’t have any use at all, and most of us will result on just throwing it into the trash until we found out that there are is still a way on how to repair and electrical cord. Just be patient and resourceful, and surely you can be able to find a lot of ways to repair broken stuff. Surely, this will not only help us to conserve electricity, but conserve money as well.
Most of us just love oil warmers or scents that can be used to make our home much more welcoming and enticing with its good smell and fresh aroma. The smell may be friendly to our noses but what about for our finished furniture?
Fragrant oil warmers that include the ones plugged into electrical outlets can cause extensive damage to our furniture’s finish once it comes contact with it. The fragrant oil eats through the finish and removes the stain. When furniture has been severely damaged, it would be hard to repair it with just a quick, easy, and complete repair. If you are one of those perfectionists, you may just take it to a professional and have it repaired. But then, when it comes to furniture finish damaged with oil fragrant there is an alternative. However, it will not look as good as new but the repair will appear better before it was touched up.
Once again, keep in mind that most furniture finish will not look as good as new when repaired instead of refinished. But when the repair is done carefully, it will look better than it did before it was spilled with fragrant oil. Now, how do we repair our furniture finish? How do we make it look better before the stain is removed?
• Follow product instructions
For best results, follow product label instructions for finishing products.
• Check the color
When unsure of a particular color or sheen, use it in a small area underneath the furniture to make sure it matches as it is desired.
• Buy a bottle of scratch repair
To repair furniture damaged by fragrant oil, you will need a bottle of Old English brand scratch repair for light or dark wood. This high quality product will stain the wood. And although it is designed to cover simple scratches, if the color is similar to your furniture finish, it may also do the repair. This can be very affordable for you as well coz you’ll be able to save money.
• Choose and Apply
Choose a scratch repair shade that is slightly lighter than the furniture stain requiring repair. It can be applied more than once to darken the shade of the appropriate hue. If Old English is not available, visit a local home improvement store or an online retailer, and purchase a kit with several color options.
Now that we had found an alternative that which can surely save our time and money, then there should be no more worries. But next time, we should just watch out for those oil fragrance oils not that we should stop buying them anymore, but let’s just keep them away from our very sensitive and highly valued finished furniture.
Have you been paying a lot every month for your electric bill? Have you always wondered why your electricity have been reaching its highs no matter how much you conserve energy by turning off your appliances and lights when not in use? But the real question is this. Does it really have something to do with your lights and appliances? Or maybe you are not aware that there had been a problem with your air ducts?
Poorly sealed air ducts can be one of the biggest energy and money losers at home. If you are much confident with your insulation wraps, that doesn’t solve the problem or it does not stop air leaks. Now, here are some ways on how you would repair air ducts.
• How to Seal Air Ducts with Mastic
Mastic seals are faster to apply than tape. They also last longer and seals better. 1. Clean the surface with a damp cloth if it is filled with dust, oily film, and grease. 2. Load brush with mastic and cover the entire joint continuously. Use the end of the brush to work the mastic into joint. Spread mastic atleast one inch on each side of the joint and it should be thick enough (about1/16 inch) to hide the metal surfaces. 3. If the gap is greater than ¼ inch in the duct connection, then use fiberglass reinforcing membrane in addition to mastic. If it is too sticky on the side, cut enough membrane to cover the joint, press it in place, and then cover with mastic. To completely cover the membrane, apply enough mastic. However, if the membrane doesn’t have a sticky side, apply a thin layer of mastic, press the membrane then apply the finishing layer of mastic. 4. Wrap ducts with insulation. It can be installed over wet mastic but try not to move the ducts too much for it could damage the mastic seal. Before applying the mastic, make sure that you’re done with all the duct support work.
• Round to Rectangular Transitions
Fiberglass reinforcing membrane may wrinkle when it’s run along a joint between round and rectangular ducts. Use a utility knife to make it flat, make a series of slices about every 2 inches then wrap it around the duct.
Now that you have learned on how to repair your air ducts, surely you won’t have any more problems with your electric bill. And when the time comes that you’ll notice your bills running high once again, you will never fail to check your air ducts and be ready to repair them.
Did your favorite piece of furniture with vinyl upholstery suffer a terrible accident? Day after day you have to deal with the horrible appearance of a hole in the vinyl upholstery of your house? Whatever is your case, I can assure you something: I know what it feels like, and it’s horrible. In Decorating Visita Casas we like to solve the decorating problems ourselves. But I must admit that the first time I heard “re upholstery”, something inside me crashed; simply, and despite being a lover of DIY philosophy, I could not imagine myself re-upholstering a piece of furniture.
But I did it, and now, if necessary or if I want a radical change of look, I do it; do you want to learn to do it yourself too? If so, you’ve reached the right article! Because I’m going to talk to you step by step how to deal with vinyl. But what do you think if we first talked a little about this fabulous material?
The Advantages of Vinyl Upholstery
[one_half_first]A very important point to take into account when decorating is the economy. The budget is something that we can never allow to get out of control. Vinyl as upholstery material is very similar to leather, but much more economical. It is for this reason that people like him so much; the problem is that its useful life is not as extensive as leather. Of course, we are talking about a material that can last up to 20 years in perfect condition; for that reason it is used not only for home furniture, also in boats, restaurants and conference rooms.[/one_half_first][one_half_last][/one_half_last]
It is one of the materials that go to the forefront in the upholstery industry. It is special for its ease to be washed and its versatility for personalization.
According to the Chemical Fabrics and Film Association, Inc.:
“A vinyl film used as part of a marine upholstery could contain a half-dozen additives to give the film the desired flexibility, color and processing stability. Other ways to customize vinyl could be by adding UV-resistant and UV-resistant materials. Fire”
In short, we are facing a strong, beautiful, versatile and more economical textile, the perfect choice! But there is something more that many do not tell us: Repairing it is simple!
Fighting Problems in Vinyl Upholstery
The most common problems that we face in upholstery are: stains, tears, materials with sticky qualities.
Many materials become unusable once they have been the victims of one of those enemies; but that is not the case with vinyl. Any of these three scenarios can be overcome with minimal treatment.
And that’s one of its great advantages, you do not have to change all the upholstery or have it repaired by an expert!
All the necessary procedures can be carried out at home and are very simple; so let’s go to the solutions for each one of them.
Remove stains caused by sticky materials
To carry out this maintenance you will need:
1 tablespoon of detergent
2 small portions of white vinegar
Clean cloths
1 container
First mix 1 cup of hot water with 1 tablespoon of detergent (the same one you use for washing dishes) and 2 servings of white vinegar.
Soak one of the cloths in the solution, squeeze the excess moisture and then place that cloth on the part of the vinyl stained with glue. Leave it there for 10 to 15 minutes for the glue to soften.
Remove the cloth from the vinyl surface. If the glue is really soft, wipe it with a damp cloth. Scrap the waste with the edge of a credit card.
Nail polish remover is also a great ally when fighting stains on vinyl.
Pour enamel remover onto a clean cloth and use it to lift any stubborn glue stain or caused by Super Glue.
Soda to clean vinyl upholstery
Another great ally is soda, not only can you clean the vinyl, it will also brighten it.
First you must dry the vinyl surface with a clean cloth. Then moisten another cloth with mineral water with gas or soda; and polish the vinyl surface with the liquid until it shines.
This maintenance is even simpler than the previous one, since you will only need:
Clean cloths
Hot water
Alcohol
Nail polish remover as well as mineral spirits will be of great help in removing these stains; however, hot water will also be a great ally.
Remember that you should always rub the vinyl with a damp cloth in the solution that you decide to apply to remove the stain; the movements you make with this cloth should always draw a circular shape.
After that, use the dry cloth or, if you want to give it brightness; the cloth with a little soda.
Repairing Broken Vinyl Upholstery
And what happens when we face a rip or worse, a hole? Even in this situation it is not necessary to change all the upholstery or discard our furniture; we can fix it.
You will need the following materials:
Vinyl patch
Vinyl Adhesive
Colorant
Scissors
Tweezers
First you must make the hole larger; No, we’re not crazy. Cut the edges of the hole to make a circle.
Buy a piece of vinyl cloth of the same color as the piece of furniture you are repairing. Being such a popular material; of sure you will find a tone equal to the one of your furniture, do not forget to take a sample.
Remember that it should be large enough to cover the entire hole. And, if you cannot find a piece of cloth that matches your furniture; Buy a white piece and paint it to match.
For this scenario you will use the dye designed to dye vinyl.
Push the new vinyl fabric under the hole, but be careful not to create an even larger opening than you already did with the scissors.
Now comes one of the steps where you must put special attention and care. Smooth the vinyl fabric under the hole so that it is completely flat.
Now, apply the vinyl adhesive around the inside edges of the hole and press the edges together to form a gapless seal around the entire perimeter of the hole.
All that is left is to let the patch dry for at least 24 hours before using the furniture. Remember not to leave it in direct sunlight.
Special Vinyl Repair Kits
There are dedicated vinyl repair kits that feature paints, fill fabrics, blades; and even heat transfer tools.
These are the vinyl repair kits that are used to repair the car, however; Are so complete that you should really consider buying one.
Especially when you have very active young children; or pets that you have not yet been able to educate to stay away from vinyl furniture.
The procedure to follow for the repair is given in these kits, we at Decorating Visit Houses; we recommend the repair kit provided by the electric heat transfer tool.
It really is very useful and the kit is very complete. So do not be discouraged if one of your furniture suffers an accident; now knows all the techniques to repair it.
Repairing Torn Vinyl Upholstery | Video
Remember to carefully press the vinyl press together. Pressing too hard could cause a gap to appear from the pieces sliding apart. For drying, keep it away from direct sunlight and wait for 24 hours to dry.
Repairing the Tricky Faded Vinyl Upholstery
First, select a vinyl color that matches the color of your upholstery before it faded. Apply a de-greasing product for cleaning. Scrub it thoroughly, getting in on all nooks and crannies so the vinyl dye could adhere properly. Allow the vinyl to dry properly by removing the de-greaser with a clean, damp cloth after cleaning. Repeat the cleaning process if necessary just to achieve that clean vinyl surface.
If you do not have a de-greaser, lacquer thinner may do. Disassemble any removable parts, and paint them separately. For painting, wear a mask and select a well-ventilated area. Cover any exposed surfaces that you do not wish to paint. Use coverings such as drop cloths and painter’s tape. Shake the vinyl dye properly before pouring it into the paint gun, then pour the shaken paint into the gun paint cups and spray unto the vinyl from about 12 inches away. To allow the paint to properly adhere to the surface, allow it to dry for 10 minutes, and just continue repeating the last 2 steps for you to achieve the vinyl color that you desire.
Repairing vinyl upholstery is very easy if you just have the right materials. If the original vinyl cover isn’t available anymore, you can just paint it. There are a lot of ways out there for you to repair your highly valued vinyl upholstery. It may take a lot of patience and effort but afterwards, it will be very fulfilling for you to see your vinyl furniture well fixed, and presentable once again.
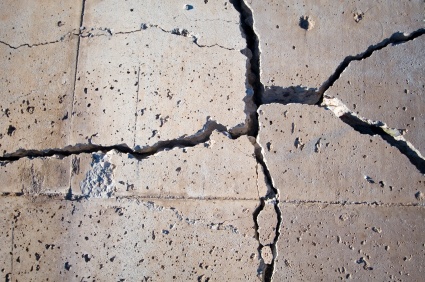
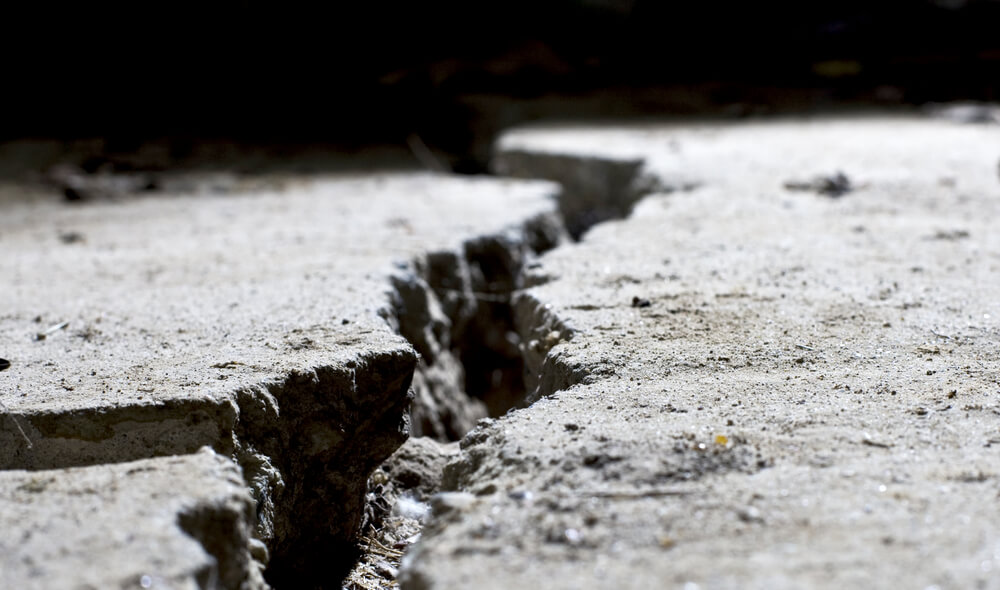
If you have cracks in your concrete, water may seep in most, especially during rainy season. The winter season may also increase the damage due to freezing temperatures and also cause the soil underneath to erode. As soon as possible, you should do something about this before it can cause further damage to your home. Repair this as early as you can and check the other parts of your home; as well as there are many more damages that needs fixing. Now, how will you repair these cracks in your concrete? How will you get your home prepared for the sudden change of weather and temperature?
Everything will depend on the type of crack or fissure we are facing; the key thing is to never consider cracks as a simply aesthetic problem. We must be prepared for the worst; so before looking for a superficial solution, first learn to determine what kind of harm we have in front of us.
A superficial or deep crack?
[one_half_first]Before you begin to give solutions to the horrible cracks that affect your home; first we will teach you how to check if they are surface cracks or if the foundations of your house are compromised. For this you will need a hammer and, although the goal is not to break the wall; yes you must strike firmly the crack in all its extension to rule that the cement behind it has not been affected.[/one_half_first][one_half_last][/one_half_last]
If the wall begins to crumble before your eyes and with simple blows the cement head; then pay attention to what is hiding behind the crack, maybe you have a rusty pipe.
In any case, your problem would not be a small or simple crack; so the solutions below are not for you. But, if the cement does not sit, then continue reading and solve that aesthetic problem together.
Why do these cracks form?
When we see cracks in the walls of our new home after only six months of having acquired it, we have doubts:
Have we been scammed and construction is not integrated?
Is the life of our family at risk in this new house?
Why did we have to touch the faulty house?
Is it normal for the entire neighborhood to have cracking problems?
The best way to answer all these doubts is to answer only the last one: Is it normal for cracks to appear? And the answer is yes.
This happens especially in new houses. It occurs during the first years in all construction. The materials settle definitively, the water remains disappear and; Exposure to environmental conditions such as changes in temperature, humidity and earthquakes also favor the appearance of these small cracks.
Thus behave all constructions, without exception.
These small cracks appear on the walls; specifically in the central part of those that exceed the three meters of length.
The area close to ceilings and beams, corners on door frames and corners under windows; all are prone to these small cracks.
No, they do not damage the structure of the building. Nor are they due to imperfections in the design; Deficiencies in the construction process or the use of low quality materials.
However, if it is an old building; then it is necessary to consider more carefully the occurrence of these cracks following the check indications given at the beginning.
But for these small cracks there are many alternatives when applying a solution; here is a list of possible materials you will need if you want to repair them yourself.
Materials for Repair
These are the possible materials that you can use to repair small cracks in concrete.
Spatula: It is the basic element to begin the repairs
Caulking Gun: it’s required to use it in the next step.
Sealant: Although there are several brands, such as Sikaflex; the good thing about this product itself is that it is flexible. Up to 50% flexible and can be painted. Thanks to it, we can cover the small cracks that tend to come out due to the mobility of the building.
Stucco powder: Its great advantage is that it allows us to prepare a more or less consistent mixture according to our needs. For this we will follow the manufacturer’s instructions; But Stucco and water will always be used.
Plastic Stucco: Offers the advantage of coming already prepared and in a white color very easy to paint. It is perfect for small cracks, but is not recommended for deep cracks.
Epoxy products: Small cracks do not always appear on walls only, also on floors. For them, it is best to use epoxy sealants; always follow the manufacturer’s instructions. There is a product A and a product B, which upon mixing, produce the sealant. It is very resistant but not flexible, it also works for walls.
Sandpaper: To eliminate imperfections once the work has been completed.
Cloth or brush: which you will use to clean the surface before applying the sealant material.
Repairing Cracks – Step by Step
As you may have seen, there are many options of materials that you can use to repair those horrible cracks; everything will depend on the circumstances. Whether you live on a very high floor in a building or if the crack is on the floor of the garage, there are several steps that you must follow verbatim in order to have a final result that you can consider a success.
The first one is to open the crack. All these materials have a capacity of adhesion and an expansive quality that is necessary to repair the crack; however, if the space to expand and settle is very small, the final work will be a failure.
For that you need the spatula. You should always expand the crack a bit to repair. How do you do it? Then you must support one of the corners of the spatula maintaining a 45 ° angle of inclination and then slide it through the crack.
This must be done twice, both to the left and right to form a “V” inside the crack. Opening the crack in this way, you will then create enough space for the material to settle.
Then remove all debris and dirt using the brush or cloth. It is necessary to perform this procedure with much patience, only this way you can prevent cracks from appearing again.
Now, depending on your case, use the sealer that suits you best. Although most people rely on the spatula to perform the spreading work inside the crack; others prefer to use a sponge. Both cases are acceptable.
Remember that usually you will need to apply two layers of sealant; but always wait until the first has completely dried before applying the second. You should also sanding excesses once a layer of sealant material has dried.
Once you have corrected any unevenness after the repair, it is time to apply the paint.
Final Tips
If the crack is in the concrete of the floor; it is best to use a hammer and a chisel to make the “V” shape instead of the spatula.
Remember that you can apply a primer to the sealant once it is dry before painting, so you will achieve a color with a more uniform finish.
Although it’s a weekend job, you have to be patient in waiting for the first coat of sealer to dry. Never overload the first layer, otherwise the cracks will reappear.
The walls and floor of the dwelling that surrounds us are not only our refuge, but our sanctuary, the reflection of our interior; That is why the cracks in them are something unacceptable.
Sadly, by simple physics cracks may appear; they are known as expansion cracks and are often an inevitable scenario.
But it can be corrected!
Repairing large cracks in concrete does not have to be a job that requires hiring a professional in the trade; that’s why we are here, the team of Decorating Visita Casas to guide you step by step in this task.
Rattan furniture are lovely. Its charm comes from its being ethnic-looking and exquisite. While a piece of rattan furniture is mostly used as a centerpiece and as a highlight in a room, it is now coming out of its shell and taking over the limelight. These days, it is not unusual to see a home themed with rattan.
Although rattan furniture would seem suited best to be placed outside the garden or the patio, fact is, rattan furniture would be best kept indoors to be preserved beautifully. Being exposed to sunlight would speed up the bleaching of the rattan’s natural color, leaving the furniture looking dull. The rain would also affect the life span of your furniture.
While naturally beautiful and physically durable, natural wear and tear can weather and run down your beloved rattan furniture. Here are some tips on how to take care of and repair rattan furniture.
The key to bringing back to life your rattan furniture while repairing it is in smoothness of the surface of the furniture. A smooth surface would ensure that the primer and the paint or varnish would stick nicely to the furniture. To repair rattan furniture, you will need to wear a dust mask as this might turn out to be a dusty task. Also, it is ideal to wear something to protect your eyes like goggles or glasses to make sure you don’t sting your eyes with particles coming off when sanding.
Begin the task by sanding the furniture with a sand paper. It is done and ready when you no longer feel rough patches in the furniture while running your hands over it. Then, wipe the rattan thoroughly with a clean cloth making sure it has no dust or dirt left on it.The next step is to spray the primer on top of the furniture, making sure the whole lot is covered. Let primer dry. Spray with topcoat of paint or varnish. Let dry. Your rattan furniture is now reincarnated and is as good as new!
A little trick to repair cracks and small dents is to apply the area with boiled linseed oil, while this will not repair the damage, this will cause the rattan to slightly swell, instant filler, making the cracks less noticeable. Liquid stains are best to rid off right away because when liquids leave a mark in rattan furniture, after a while it is next to impossible to be removed. To get rid of the stain, use a harsh cloth with a bit of detergent, rubbing off the stain.
Ever felt like the floor you are walking on is not solid or even? Ever had that feeling that your footsteps goes thumpety thump, thumpety thump when you are walking? It must be that your floor joists are sagging. Say what? Since these floor joists are placed during the very early stages of a building or home construction, some people may have never even seen their floor joists. But though you may have never seen what is underneath your floor, these floor joists play a major part in supporting the structure and in the security of your floor and the whole building.
You may ask yourself, if I have not seen it, then how is it possible for me to repair sagging floor joists in my house?
While it is quite difficult and may require advanced skill from the worker, it still is an achievable task. You must understand where the problem is coming from. Sagging floor joists may result from age. Over time and pressure, wood will flex and bow causing it to sag. Even floor joists which were installed properly in the beginning, will give in at some point. This is especially true for older buildings or homes, making it necessary to repair sagging floor joists.
To enable you and your family to feel secure that you are walking on solid ground, the following are helpful guide in repairing sagging floor joists. If your house has a basement, the ideal way to fix sagging floor joists is by use of a brace. You need to install a beam vertical to the joists in the mid section. The beam has to be the same size as your joists. This can be done by use of boards.
The boards to be used to create your beam need to be able to cross from wall to wall across your floor joists. Cut the boards and attach together with the use of adhesive and nails. The next step is to put the brace in place. Wedge a board in a slight angle in between the basement floor and your beam. Using a hammer, straighten the base of the wedge to push up the beam to take the sag out of the joists. Once done with the procedure, check whether the floor is already level enough, if not continue with the same step. It is best to install posts every after few feet to serve as support. This will help in postponing future sagging of the floor joists. Although, it is recommended to get a contractor for professional help for this kind of job, it can still be done properly by yourself if you just carefully follow the steps mentioned in above. After all, to whom is it better to entrust the safety of yourself and your family than your own hands?
One of the best places to lounge and relax after a long day of work is your ever dependable couch. It is a must in every home and you will rarely see a home that doesn’t have one. Among the most popular materials in couches would be leather. Not only does it give such a modern touch but it’s also easy to maintain and will incur lesser stains specifically for genuine leather materials. Leather couches also grow beautiful with age specifically showing off its patina.
Despite the durability of leather, without proper care or due to unexpected accidents, owners of leather couches may usually encounter cracks or tears. Most people do not find the means on how to repair tear in leather couch simply because they feel it’s too tedious or has no remedy.
With the help of your local hardware store, purchase a leather repair kit. Assessing the damage on the leather, you may also have to buy the same or closest leather material or color in case the tear is too large to mend by sewing or sealing alone. There are a few techniques on how to repair tear in leather couch and one technique is to apply glue or compounds specifically used for leather. Some leather kits already have this while some kits are for mending using sewing techniques. For an even and less noticeable repair, most professionals use leather glue compounds.
Since leather is a porous and slightly expandable material, regular strong glues or glues used for hard materials won’t be able to repair that. It may actually cause more damage to the material and you may just end up buying a new couch. To start off, most leather kits will have a prepping agent or solution for you to clean the damage area to ensure the mending material will adhere later on. You may also clean the damaged area first with leather friendly soap and water and let dry before applying the prepping agent. For leather tears that are larger or have pieces missing, a patch would be needed and most kits would have this already. After sealing the area, you may proceed to applying the main mender or compound. Make sure to follow the instructions and application procedures on the product based on the manufacturer’s specifications.
Usually, compounds for leather repair will have to be completely dry prior to using a protective coating. Once the area is ready, ensure that it’s clean and smooth out any uneven parts with the tools and solutions provided in your leather repair kit. Lastly, apply leather conditioner to enable the repaired area and materials to blend in. Leather conditioners also help in making the area more durable and stretchable to avoid future tears and damage. Consider applying the leather conditioner on the whole couch as well. There are also leather protectors available in liquid or wax form. These will protect from minor scuffs and scratches as well as stains.
You were so excited moving in to your new home, fixing and arranging every little detail to your liking. After all, this is where you intend to spend most of your precious time with your loved ones. And the walls of each room are no exception. With a lot to think about and to choose from, you just don’t know how to decide. To paint or to paper? Colors, patterns, etc. Finally, you settle for flower patterned wallpaper for your daughter’s room. Wallpapers are a good alternative for paints with a lot of designs to choose from, even to match your furniture and home decors.
But as much as you would like to these wallpapers to remain as glued to the wall as the day you fixed it, it just won’t stick forever! Over time and with other factors such as humidity, wallpapers are bound to peel. Here are some ideas on how to repair peeling wallpaper if you do not want to change it just yet or you simply do not have the time or the money to re-paper the whole room.
To repair peeling wallpaper you would need the following materials: sponge, wallpaper glue, paint brush and a seam roller or a squeegee.
The first step to repair peeling wallpaper is to dampen the peeled area with a sponge to saturate the glue, then gently lift the peeled wallpaper for as much as it can be lifted, carefully doing so without tearing the whole thing apart. Make sure that the area is smooth and no glue is left on the surface. Wipe off any excess water to make sure it is dry and ready. With the use of a paint brush, apply a thin layer of wallpaper glue on the surface, spreading just enough to cover the entire area. Press the wallpaper back to the wall, making sure it is even and smoothened out.
Any excess glue can be wiped off with the use of a damp sponge. Just make sure that sponge is not too wet otherwise it will buckle. To even out the wallpaper and make sure it fixed smoothly, you can use a seam roller and run it over the area, or in the absence of a seam roller, a squeegee can perform the same role. This can also help to make sure bubbles are avoided. However, should there be bubbles on the paper, another trick is to cut over the bubbles with a very thin, sharp knife to release the air and with the use of the paint brush, apply glue on the back flaps of the wallpaper. You can then run it over again with the seam roller or squeegee just to make sure.
Another useful idea in wallpapering is to make sure you buy enough materials. Should there be cases like this when you need to repair peeling wallpaper. An extra roll or so would come in handy.
Our hardwood floors are more delicate than we think despite their hard name. The deep scratches caused to them by the furniture that we daily slip; can make the whole floor virtually unusable.
It is true that we can continue walking on them without problems; but the true problem is aesthetically, they will become almost a cancer for our eyes.
Repairing them is simpler than you think, as long as you do it right; so here at Decorating Visita Casas, we will tell you the techniques to follow, and great advice to avoid these scratches.
A work of art as delicate as a stained glass, definitely makes it a more intimidating experience than normal when we hear that crackling crack!
Repairing a stained glass window was something that was simply out of our league here at Decorating Visita Casas, until we tried.
After our experience with the mosaics, the stained-glass window was not so intimidating to see it close up. Maintenance is relatively simple once you have become familiar with the products that are used and; developing the technique to repair it, is a work of patience and practice Today we teach you how to do it!
We just love how plaster walls distinctively create that custom design that you could never have done if you had simply used bricks in constructing that boring wall of your home. But, like all things in this world, plaster walls aren’t just made forever. These walls sometimes still manage to break and crumble, and here we are about to discuss technical possibilities from a generic perspective, on how to repair a plaster wall.
First of all, we all know the composition of a plaster wall. It is generally stuck onto its place once the plaster completely dries and hardens. There is generally no way that you can fix the damage without redoing some of the damaged parts again using a new plaster. This is where a little creativity and artistic skill comes into good practice.
You can easily scrape of the unwanted mark and repair a plaster wall by preparing the same material that you have used for the plaster wall. But for a more sturdy mix, you may want to try something that is of the same color but of better composition. Try to ask you local hardware dealer about good compound mixes that can match your plaster wall well, and stick with it for all of your plaster wall fixing needs later on.
The fix that you would need to do depends on the type of damage that is done to the plaster surface. For holes, fill them up by carefully using a putty knife to fill in the holes with the same plaster material. Apply the plaster in two coats, one for filling the hole, and the other for the indentation that the first coat will make after it dries. Make the new surface nice and smooth using sandpaper afterwards.
Loose areas and cracks need to be reinforced first before attempting to restore the plaster. Drill a few screws near the area where the crack is, just in case the plaster can’t hold well. For patches of damaged plaster, you may have to screw the entire patch to secure it in place for repair. Do not use too many screws, try to space them as wide apart as possible. Apply the new plaster just as you would in filling a hole, but this time apply it to the long, open cracks. Oh, and don’t worry about the holes made by the screws, you can do the same hole-filling job to complete the task.
For areas or large holes with the plaster damaged, you don’t have to fill the entire hole or area with the plaster material in the wall. Simply screw in something that can fill up the space, and then apply a thin layer of the plaster material onto the surface of the placed “filler” material. Remember, applied coats shrinks a bit when it dries, so you need to watch out for the level of coating that you apply.
The invention of the washing machines just made life a lot easier. Imagine never having to scrub you way during each laundry session, just think on the huge amount of time saved by just one simple machine. But machines, just like our cars and toasters, sometimes do break down and stop from working properly. A quick visit to your repair man might solve everything, but wouldn’t it be better for you to repair a washing machine yourself?
Before you tinker with the interior of your washing machine, you need to assess first the damage and the problem. What we need to see and know from this assessment is whether the problem is simple enough for us to repair a washing machine on our own. Tampering with the interior of a washing machine is a very risky thing to do, most especially if you don’t. Besides, you’d end up breaking the washing machine all the more if you try to mess with it without knowing its interior workings.
The first and most common problem would be the simple mechanical failures. For those not using digital keypads on a washing machine, the dial on your washing machine is actually less electrical in nature than what it really is. It is really a simple spring mechanism, much like what you would see in old clocks and wristwatches. Washing machines using this kind of dial sometimes break up and get loose. Try opening the dial using something that can fit through the small opening around the dial, and rearrange the mechanism. For unresponsive buttons in digital keypads, open the keypad (you may have to use screwdrivers or something that can tip off covers). If you see a paper-like circuit board, use a pencil to shade the part where the button is supposed to be pressed.
Another example of a simple mechanical failure is when something gets clogged into the spinning of a washing machine. People sometimes forget to remove certain items from the pockets of their clothes, coins, clips, pieces of paper, etc. These obstructions are usually unable to break through the mechanism of the washing machine, although some smaller ones are usually able to go through. You’d have to open the entire washing machine to see this problem, but simply removing the obstruction can instantly fix this problem.
Improperly grounded electrical connections are probably the most hazardous problems that you can face in washing machine repair. If you’re still alive to notice and assess this problem, check first the simple electrical connection whether there might be some misplaced areas or live wires. If there is none around the machine and the problem still persists, then it’s best that you bring it to the nearest repairman right away to avoid any further problems.
Not all washing machine problems can be solved by yourself, but you can save a lot of money in the long run, if you at least know how to fix the simpler problems on your laundry workhorse.
Man is as ever the advocate of cleanliness and hygiene with the use of running water. This idea is especially true in our modern age, as faucets find their way in almost any critical area that would need water as a cleaning agent. Kitchen sinks are just one of those areas, and if you want them to continue functioning properly you may want to do know some ways to fix these important outlets of running water and repair kitchen faucets.
There are many kinds and designs for faucets, so a standard way of repairing all of these faucets is just impossible. But remember, the mechanisms for all faucets remain nearly the same. This is where we will focus our repairing methods.
For the simplest method of repairing faucets, always remember to keep extra parts for the faucets. This is so that you can immediately replace a defective part once it is found. A handful of washers, nuts, bolts, screws and o-rings can really prove helpful once you needed a quick part replacement. If in case you find that there is actually no need to replace the part, just rearrange the parts properly to ensure that the faucet mechanism runs properly and is intact.
Know that the parts needed for each type of faucet would be different from the other. If you have to repair kitchen faucets, be sure that you keep the exact type of part that is well compatible. The older type of faucet is the compression type. It uses a single hand turning mechanism to open and close valves using a simple mechanism that is held by screws and bolts. The likeliness to leak results from the constant pressure that it receives from its constant attempt to stop the water using the strength of the valve.
If the problem lies in the pipe that leads to the faucet, you simply have to apply the proper sealant to put things into place again. Make sure that you use a sealant that can be used in the water, or just try to turn off the home water pump first. Do not use the water from the kitchen faucet until the sealant totally dries up well into the damaged pipe.
That solves most of the problems concerning the overflow of water, but what about if the water doesn’t flow well into the faucet? Check the aerator to see if things are still running in good condition. This is the device that regulates the pressure of the water to the air pressure to let the water flow freely into pipe going to the faucet. If you see heavy mineral build up, then that would be reason for our clogged faucet. Scrub it well with a toothbrush too remove the mineral deposits, and to allow the water to flow freely again into the aerator.
Termites are just some of the worst enemies that you can encounter in your home. Many houses nowadays are already made of concrete, but some of the inner or outer designs of other homes are made up of wood. Having termite damage on these precious homes would be the last thing any home owner wants to think of. But if the horror had already come past, you generally have no other choice but to face and repair termite damage.
Assess the level of damage that has been done to the house. Are the critters just at the initial stage? Are they planning a major offensive on the largest wooden areas of my home? Are they already preparing for the invasion of your home’s very foundation? We would need a proper intelligence report about their actions in order for us to mount the best counteroffensive and ultimately repair termite damage.
If their forces have just finished settling their base camps into your home as small trails of termites, then it would be the best move to bolster our defenses as early as possible. Apply a special liquid substance to the wood that will enable it to harden and make it impervious to their deadly jaws. There are many commercially available products out there is specifically made to do this, and luckily it just takes a short trip to your local hardware store to secure your wood’s tactical positions.
If the wood has already suffered damage, try to chip away the damaged parts using a chisel or anything that can be used to poke out the areas where the termites have advanced their forces. Use this strategy only if the entire wood is still fully functional after removing the damaged parts.
After removing the damaged part, use a wood filler to reestablish woods defenses back into position. After applying the wood filler, use a sandpaper to scrape of the irregular areas and mold it to return the wood to its original shape before the termite assault. It is recommended that you use a paint that matches the paint used around the area to completely remove evidence of damage.
If the termites have dealt a significant amount of damage to the wood, then it’s best that you retire it out of its position. Cut the damaged wood out of its place using a saw, cut a small part around the undamaged wood, to ensure that no damaged wood remains. Now replace that wood with another block of wood of the same size, and hammer or screw it into place. You can use several small pieces of wood instead if needed.
Remember, if your home is made of wood., or has a significant area of it made of wood, then its best that you remain vigilant for these little critters at all times. It is generally easier to pound them away before they can even position their forces, rather than replacing the losses after they had already mounted an offensive