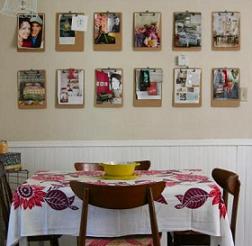
Photos are shot for a remembrance for all of us. We take photos so that in due time we tend to cherish the memories that took place. We laugh and cry at the pictures that we reminisce at. Remembering and missing the friends we used to hang out with and the fun that happens spontaneously in our lives. Photos are meant to be displayed and be seen by people.
Decorating with photos on frames is like displaying your artwork on the wall. Camera work is a famous branch of art. An art which in you capture the most beautiful and breath taking scenes. As we can see, people love taking pictures of themselves and other people too. A person loves to take pictures of anything and absolutely anything. May it be hilarious or in formal ways just to have fun doing the poses for the camera.
In the past, the only existing photos are black and white. But these days, colored pictures are now well-known. We see a lot of pictures on walls even on the internet. May it be colored or in black and white. Black and white pictures are coming back to way of life. Some people love to take it in the old fashion way. Portraits have continuously been in frames on walls. Some people even decorate their own frames for their photos. Frames are used to display the photographs that you have captured.
How to hang a picture on walls made of plastic
As you can see, using photos to decorate your home is widely used today, and it will also give your home a more welcoming look.
Dying to hang your favorite picture or portrait of you on your wall but remembered that your wall is of plaster and you’re scared to have cracks or holes on it? Well then, today is your lucky day because we will give you tips on how to hang your pictures on plaster walls without chipping or crumbling it. We will not do the old style that we’ll just hammer the nail on the wall but instead, we’ll be doing simple and easy ways to hang up your pictures.
Here are the following tips and instructions that you can do:
• An old school style in hanging things on plaster is that heat first the nail that you will use. After heating, hammer it to the wall. It will easily and smoothly be pushed inside the wall without chipping it.
• A very tricky thing that you can do is to use masking tape. Applying masking tape helps the plaster in order not to chip easily. Basically, it supports the plaster. In applying the tape, determine first where you will put the nail. After that, put masking tape on the position you chose.
• Next thing that you need to find out is what kind of picture hangers that you should use. Read this carefully:
If you’re going to hang up a small picture, use small picture hooks (adhesive-backed ones) with nails. The problem with small hooks is that it does have a high rate that it can still damage your walls but of course, you should be really careful in hammering it to the wall. We also recommend that you hammer it in an angle of 45 degrees for the best outcome.
D.I.Y: Hang Pictures on Plaster walls
The best way to make your house, condo, apartment or even one small place look great is to decorate it. Furniture gives a pleasant ambience as well as wall-hang pictures. If you want to add or hang picture or any small furniture into your wall, don’t ever think that hammer and nails are enough. You are definitely wrong. If you insist to use these materials, you can probably produce cracks or hole that is bigger than the diameter of the nail. Plastered walls usually have coating of lime putty mixed with Plaster of Paris. This kind of plaster mix can cover walls durably but it crumbles, ships and breaks off easily.
Older days, houses were built with wood molding, also known as ‘picture rail’. Placing hooks at different locations into the picture rail is normal. Then, using wires, strings, etc. pictures or small piece of furniture were hung to the hooks. Through this way, no holes are made in the plaster walls.
Presently, investigating the other hanger types that are available in the market is better than reaching hammer and nails. One of the various types of hanger is made of hard plastic materials which are available in different sizes. A heavy duty adhesive was built in its back which becomes sticky once it gets wet. Allow the adhesive to set in a couple of minutes then position the plastic hanger on the wall. Firmly press the adhesive against the wall and let it be undisturbed for a period of time. After giving enough time, hanger is ready to hold the thing you want to hang on it.


2 comments